Chord Progression Editor
The chord progression editor tool allows the user to create chord progressions that can be used in songs. You can access the chord progression editor by either editing a preset or by edit a chord progression in the song editor. The following sections will explain how to use the chord progression editor.
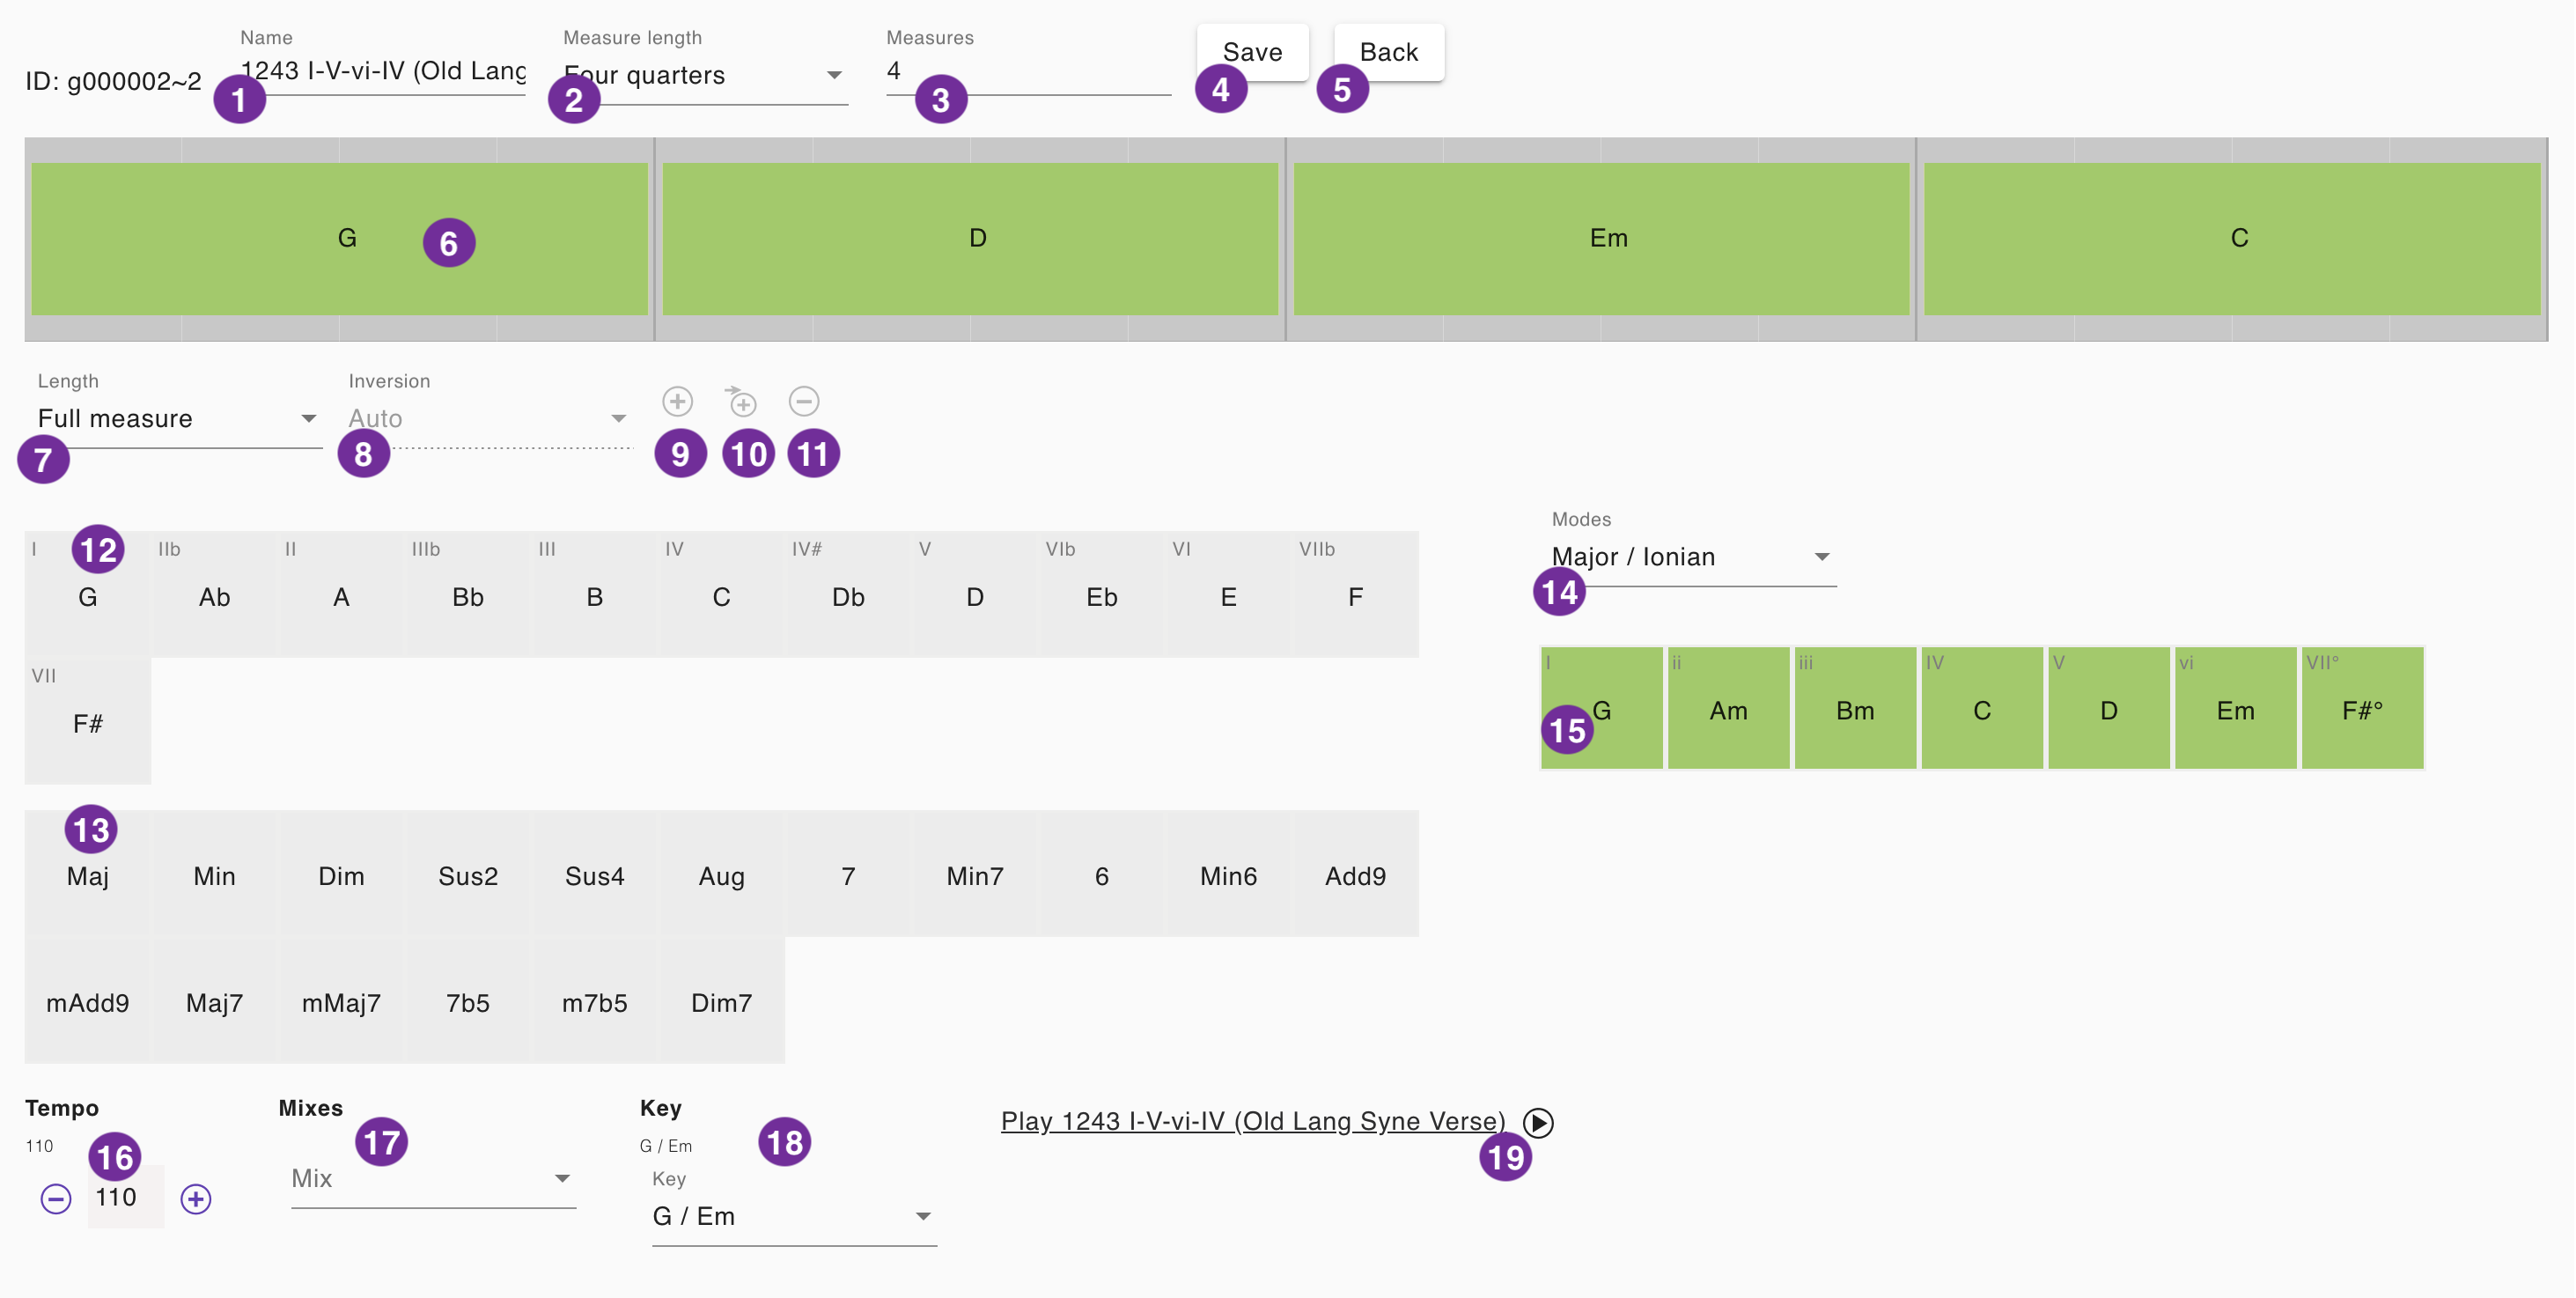
1 - Chord progression name
Enter the name of the chord progression. The name will be displayed in the chord progression selector. It is recommended to use a name that helps you to identify the chord progression. Using in a song you can just use the name of the section where the chord progression is played. In a preset it is recommended to follow the name convention that we use in the presets.
2 - Measure length
The length of the measure. We always use a quarter note based time signature. That means selecting "3 quarters" will result in a time signature of 3/4, "4 quarters" will result in a time signature of 4/4. If you want to use a time signature of 6/8 you can just select "3 quarters". "4 quarters" is the default value that will be used in most of the songs. When you are editing a chord progression for a song the measure length will be set to the measure length of the song. You can change the measure length, but it is not recommended to do so. If you want to use a different measure length for a song, you have to create a new song with the desired measure length.
3 - Measures
The number of measures your chord progression will have. Do not change that value it will be calculated automatically
4 - Save
Click this button to save the chord progression. If you are editing a chord progression in a song, the chord progression will be saved to the song. If you are editing a chord progression as a preset, the chord progression will be available in the list of presets.
5 - Back
This button is displayed only if you are editing a chord progression in a song. Click this button to go back to the song editor. The changes made to the chord progression will not be saved automatically. You have to click the "Save" button before to save the changes.
6 - Chord selection
By clicking on the colored area with the chord symbol in the current chord progression you can select a chord. This allows you to change the current chord (12,13,15), to change the length of the current chord (7), to choose an inversion for the chord (8) or to remove the chord from the progression (11). The mentioned functions become active when selecting a chord. Clicking on a chord again will deselect the chord. The activated functions will be deactivated again then.
7 - Chord length
You can select the number of measures the currently selected chord will be played. The default value is one full measure. You can choose at least one half measure up to three measures. If no chord is selected, the chord length will be used for the Append function (10).
8 - Inversion
You can select the inversion of the currently selected chord. The default value is "Root" inversion. You can also choose between, "First" and "Second" both in a lowered octave as well. Also you can select the "Root" inversion in a lower and a higher octave. The value "Auto" means that the inversion will be chosen automatically trying to stay as close as possible to the previously played chord. This option will be applied by default. You should make sure to assign at least one inversion of your progression manually, usually to the "Root" inversion. Otherwise the pitch may shift when playing the progression repeatedly.
9 - Add a chord
Click this button to add a chord to the chord progression. The chord will be added after the currently selected chord. The button becomes active when a chord from the progression is selected (6). The new chord will use the values highlighted in (12,13) which are those of the currently selected chord. You can change the chord afterwards using (12,13) or (15).
10 - Append
Click this button to append a chord to the end of the chord progression. The button becomes active when a chord from the selection panel is selected (12,13). The new chord will use the values highlighted in (12,13).
11 - Remove
Click this button to remove the currently selected chord from the chord progression. The button becomes active when a chord from the progression is selected (6).
12 - Chord selection panel - Key
Together with panel (13) this panel allows you to select a chord. The key defines the root note of the chord. You can select one of the 12 chromatic notes. If the panel was not highlighted before, it will be highlighted now. The panel (13) will be highlighted as well, selecting the Major key type. If the panels was highlighted before the chord type will not change. If there is a chord selected in the current progression, the chord will be changed to the selected key and type otherwise the selected chord in the panels will be used for the append function (10). Selecting a chord in the progression (6) will highlight the panels (12,13) with the key and type of the selected chord.
13 - Chord selection panel - Type
Together with panel (12) this panel allows you to select a chord. You can select from one of 17 common triad or four note chord types. If the panel was not highlighted before, it will be highlighted now. The panel (12) will be highlighted as well, selecting the current root key. If the panel was highlighted before the chord key will not change If there is a chord selected in the current progression, the chord will be changed to the selected key and type otherwise the selected chord in the panels will be used for the append function (10). Selecting a chord in the progression (6) will highlight the panels (12,13) with the key and type of the selected chord.
14 - Mode selection
You can select the mode for the diatonic chord selection panel below. The default value is "Major". The mode will be applied to the quick chord selection panel (15) showing the basic chords for the selected mode.
15 - Quick chord selection panel
This panel allows you to select a chord with one click. The panel shows the basic diatonic chords for the selected mode (14). You can select a chord by clicking on it. If there is a chord selected in the current progression, the chord will be changed to the selected chord otherwise the selected chord in the panel will be used for the append function (10). Selecting a chord in the quick chord selection panel (15) will also highlight the panels (12,13) with the key and type of the selected chord.
16 - Sample Playback - Tempo
The tempo of the sample playback. The default value is 120, in the case you are editing a chord progression in a song, the tempo of the song will be used. You can change the tempo by clicking on the plus and minus buttons in steps of 5.
17 - Sample Playback - Mix
The mix of the sample playback. A default value is chosen depending on your activities before. In the case you are editing a chord progression in a song, the mix will taken from the song. You can select the mix from the preset list.
18 - Sample Playback - Key
The key of the sample playback. The default value is "C / Am", in the case you are editing a chord progression in a song, the key will taken from the song. You can select the key from the selection list. It will be also applied to the chord selection panels (12,13 and 15).
19 - Sample Playback - Play
Click this button to play the chord progression. The button will change to a stop button. The playback will repeat the chord progression 3 times. You can stop the playback by clicking the stop button.