Song Editor
The song editor tool allows the user to create a song by combining chord progressions and mixes. Below we give a detailed description of the items marked on the screen shot.
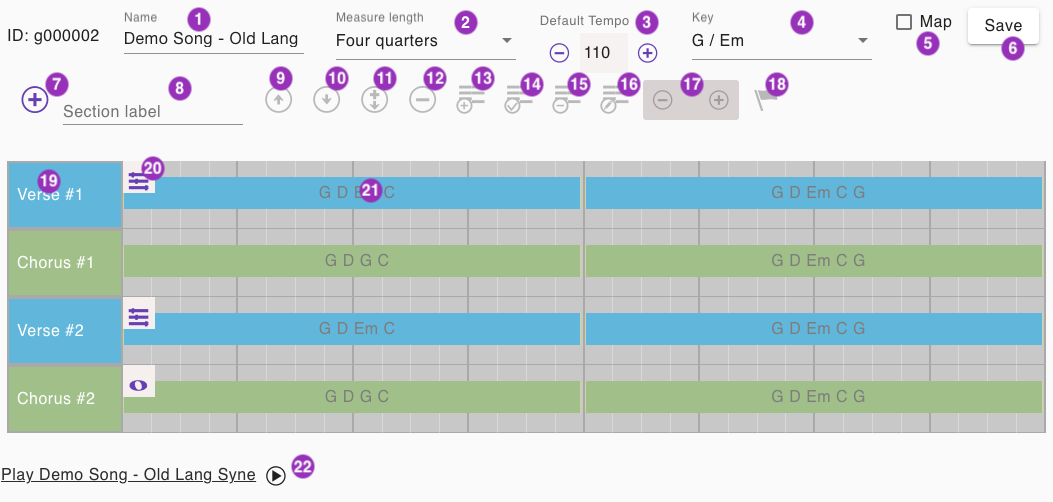
1 - Name field
Enter the name of the song here. It will be used on the overview page where you can filter the list for the name.
2 - Measure length
The length of the measure. We always use a quarter note based time signature. That means selecting "3 quarters" will result in a time signature of 3/4, "4 quarters" will result in a time signature of 4/4. If you want to use a time signature of 6/8 you can just select "3 quarters". "4 quarters" is the default value that will be used in most of the songs.
3 - Tempo
The tempo of the song in BPM. The default value is 120 BPM. You can change it in steps of 5 BPM by clicking on the plus or minus button.
4 - Key
The key signature of the song. The default value is C major / A minor. You can change it by selecting from the list. You can select from a lower or higher octave, the lower octave is marked with "-1". All chord progressions will be automatically adjusted to the new key.
5 - Save Midi Map
Checking this box the current MIDI mapping will be saved with the song. This means that, the song will keep the current mapping even if you change the mapping in the global settings. Otherwise, the song will use the mapping defined in the global settings.
6 - Save button
Click this button to save the song. The song is saved in the browser's local storage. This means that the song will be available even if you close the browser or restart your computer. You can also export the song to a file and import it again later on other devices. See the section "Export and import" for more information.
7 - Add new section
Click this button to add a new empty section to the song. If you have a section selected (see 19), the new section will be added after the selected section. Otherwise, the new section will be added at the end of the song. The name of the section will be like in the Label field (9) specified otherwise it is called "Squence". Make sure to rename the section using the label field (9) to something more meaningful. Make also sure to chose different names for different sections. If your Verse consists of multiple sections for example, make sure to name them Verse 1, Verse 2, etc.
8 - Section label
Changes the name of the currently selected section. If no section is selected the label will be applied for a new section created using the add button (7). You can chose a predefined name from the list or enter a custom name. Make sure to chose different names for different sections. If your Verse consists of multiple sections for example, make sure to name them Verse 1, Verse 2, etc.
9 - Move upwards
Click this button to move the currently selected section one position upwards. Please note you can only move sections up if they are not the first section in the song. Also you can not change position of two different duplicates of the same section. You must move the upper duplicate first.
10 - Move downwards
Click this button to move the currently selected section one position downwards. Please note you can only move sections down if they are not the last section in the song. Also you can not change position of two different duplicates of the same section. You must move the lower duplicate first.
11 - Duplicate section
Click this button to duplicate the currently selected section. The duplicated section will be added after the original section. The name of the duplicated section will be the same as the original section, displayed with a number added at the end. If the original section is called "Verse" the duplicated section will be displayed as "Verse #2". If the original section is called "Verse 2" the duplicated section will be displayed as "Verse 2 #2". duplicated sections share the same chord progressions and mix change event as the original section. Changing of the chord progressions or mix change event in one section will also change the other section.
12 - Delete section
Click this button to delete the currently selected section. If your section has a duplicate, the duplicate copy will not be deleted.
13 - Create new chord progression
Click this button to create a new chord progression within the currently selected section. If you have a chord progression selected (see 21), the new chord progression will be added after the selected chord progression. Otherwise, the new chord progression will be added at the end of the section. The new Chord progression will get only one tonic chord. A dialog window will appear asking you to save the song and open the chord progression editor. Click "Save And Open Editor" to save the song and open the chord progression editor. Otherwise the dialog window will disappear and the chord progression will contain only one tonic chord.
14 - Select existing chord progression
Click this button to select an existing chord progression. The selected chord progression will be added to the currently selected section. If you have a chord progression selected (see 21), the new chord progression will be added after the selected chord progression. Otherwise, the new chord progression will be added at the end of the section. You can select a chord progression from the presets or from the chord progressions you have created for the song before.
15 - Remove chord progression
Click this button to remove the currently selected chord progression from the section.
16 - Edit chord progression
Click this button to open the chord progression editor for the currently selected chord progression.
17 - Repeat chord progression
The chord progression will be repeated the number of times specified in the field. You can change it in steps of 1 by clicking on the plus or minus button.
18 - Add Event
Click this button to add a new event to the currently selected chord progression. If you have already an event selected (see 20), the new event will be added after the previously selected event. By clicking on the Button the "Event Editor Dialog" will open. Songbuilder supports the "Mix Change" and "Ending" event at the moment.
19 - Select section
Click this area to select the section. The selected section will be highlighted. After selecting a section, the following buttons will be enabled: 9-14 and 18. By clicking on the area again, the section will be deselected and the buttons will be disabled again.
20 - Select event
Click this button to open the event editor for editing or removing the currently selected event.
21 - Select chord progression
Click this area to select the chord progression. The selected chord progression will be highlighted. After selecting a chord progression, the buttons 15-17 will be enabled.
22 - Play song
Click this button to play the song. The song will be played from the beginning if no section is selected. Otherwise, the song will be played from the selected section. The song will be played until the end of the song. You can stop the playback by clicking the stop play button.