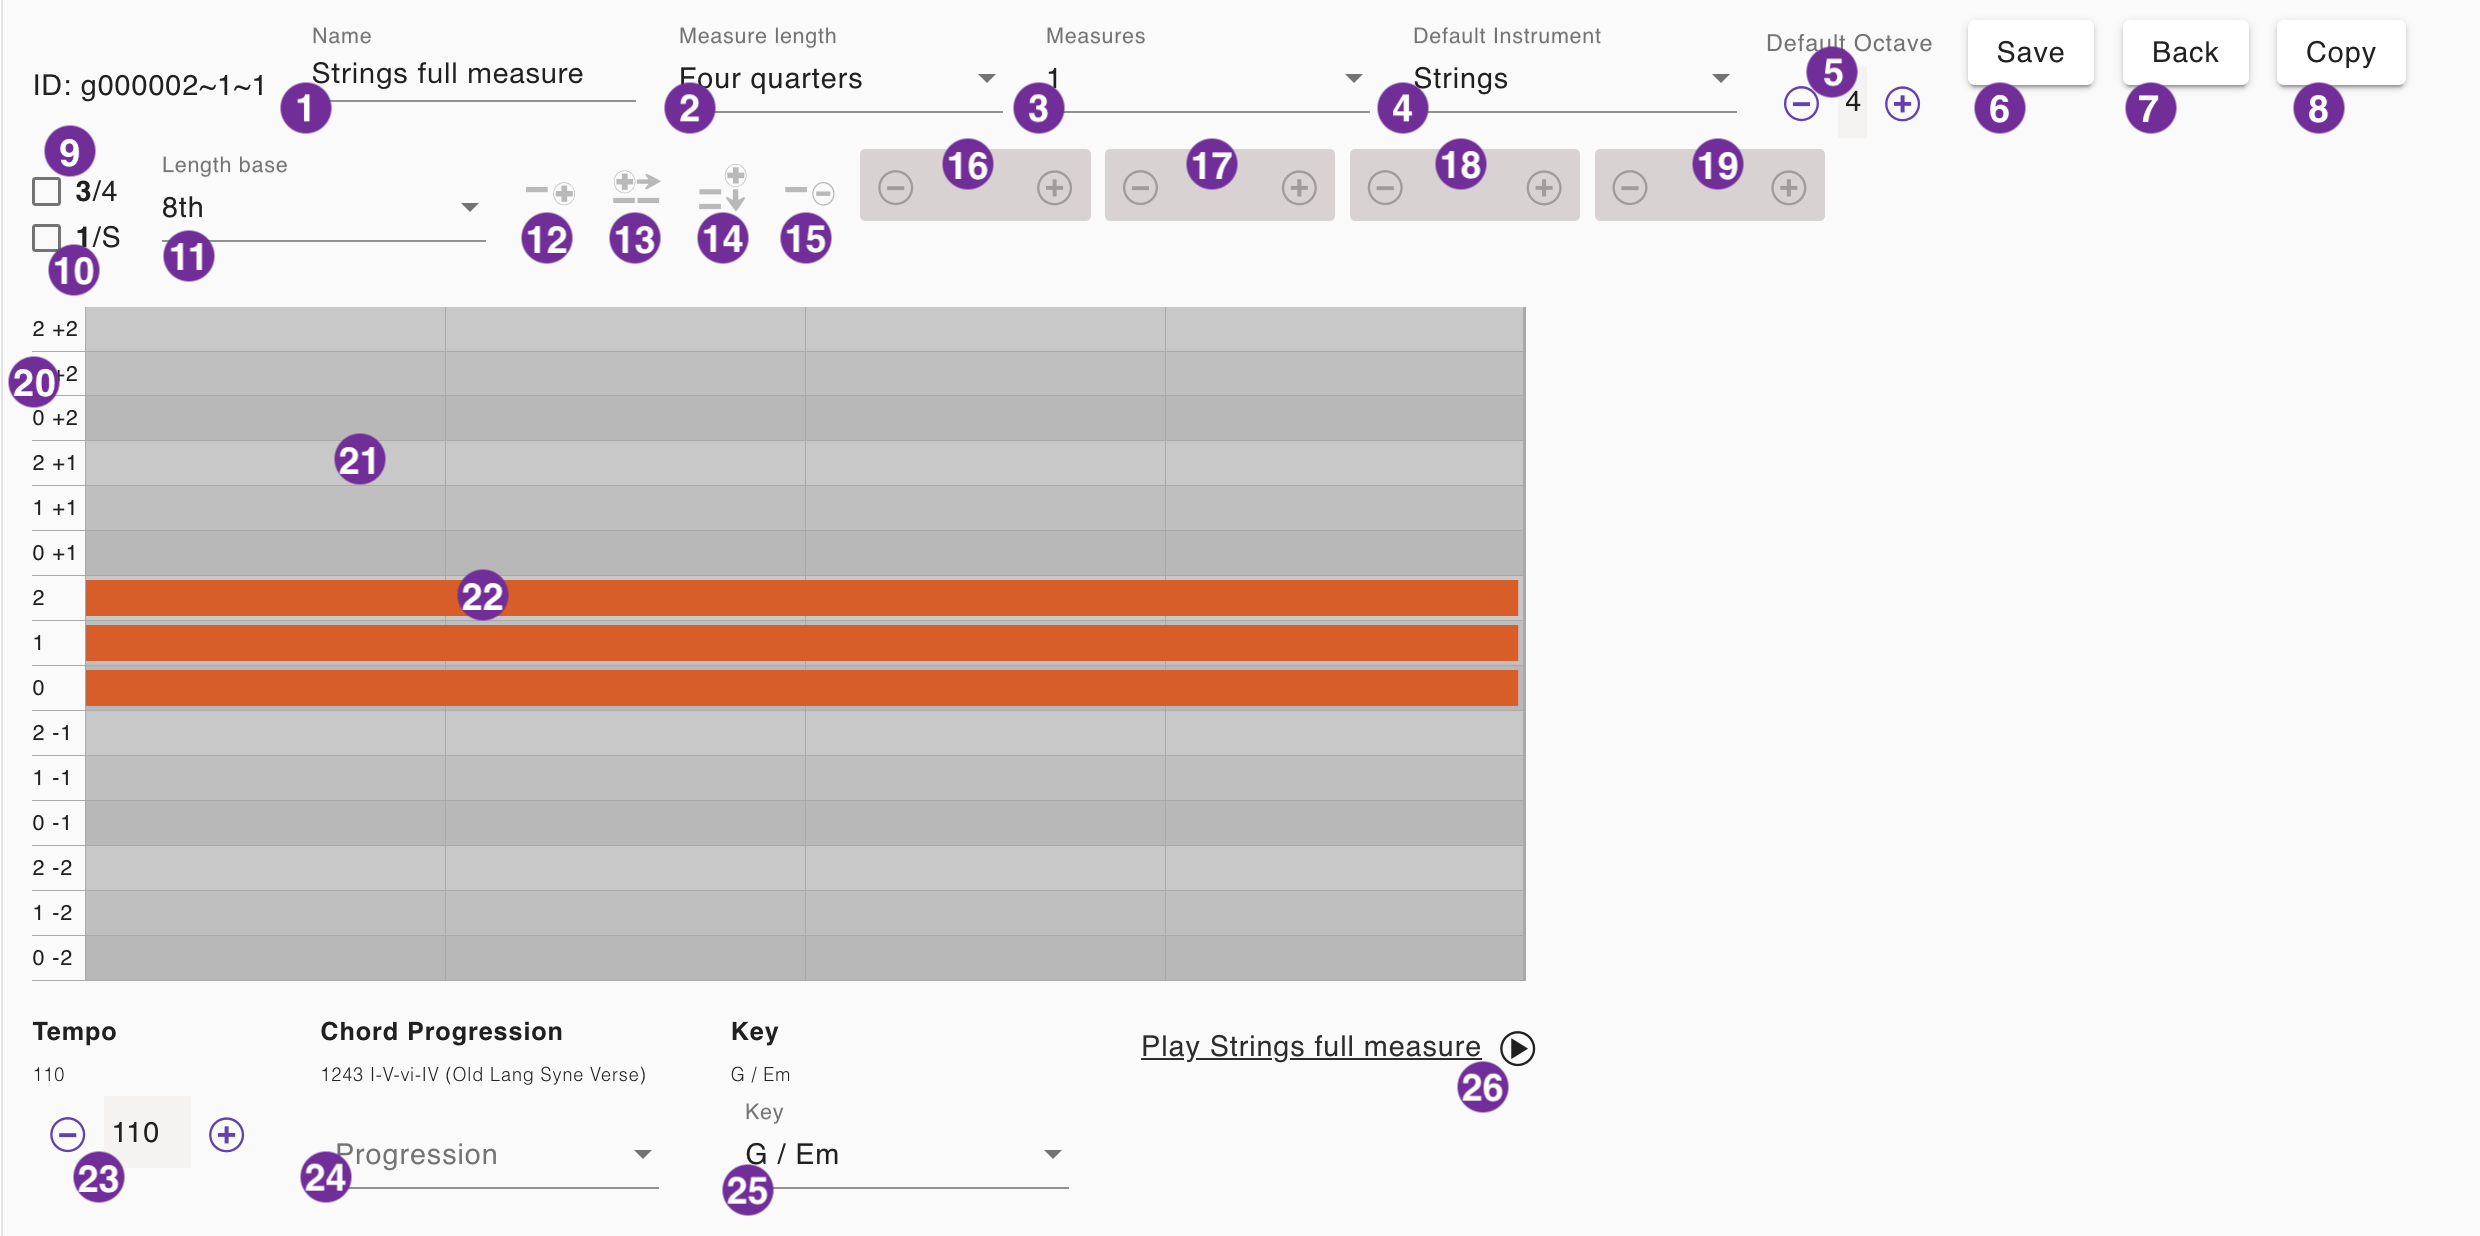
Pattern Editor
The pattern editor tool allows the user to create patterns that can be used in mixes. The pattern editor can be used for instrument tracks and drum tracks. You can access the tool by either editing a preset or by editing a pattern via the mix editor. The following sections will explain the different parts of the pattern editor. We will use an instrument track as an example but we will explain the differences for drum tracks as well.
1 - Pattern name
Enter the name of the pattern. The name will be displayed in the pattern selector. It is recommended to use a name that helps you to identify the pattern. Using in a mix you can just use the name of the instrument type. In a preset it is recommended to follow the name convention that we use in the presets. That means the name should consist of the mix name the pattern was originally created for and the instrument type. For example: "Awesome - Bass".
2 - Measure length
The length of the measure. We always use a quarter note based time signature. That means selecting "3 quarters" will result in a time signature of 3/4, "4 quarters" will result in a time signature of 4/4. If you want to use a time signature of 6/8 you can just select "3 quarters". "4 quarters" is the default value that will be used in most of the songs.
3 - Pattern length
The length of the pattern in measures. The default value is 1. By changing it to a higher value for an existing pattern you create empty space for the following measures which you can fill with notes. You can also change the pattern length to a lower value. In this case the notes of the second measure will be ignored. The pattern length of a pattern must be considered in the mix editor where you use the pattern.
4 - Default instrument
The default instrument type the pattern is designed for. You can override it by selecting a different instrument type in the mix editor. The default instrument selection is only applicable for instrument tracks. Songbuilder provides the following instrument types: "Piano", "Guitar", "Strings", "Synth", and "Bass". The preselected instrument type is "Piano".
5 - Default octave
The default octave the pattern is designed for. You can override it by selecting a different octave in the mix editor. The default octave value is only applicable for instrument tracks. You can change the octave value by clicking on the plus and minus buttons. The default value is 4.
6 - Save
Click this button to save the pattern. If you are editing a pattern in a mix, the pattern will be saved to the mix. If you are editing a pattern as a preset, the pattern will be available in the list of presets.
7 - Back
This button is displayed only if you are editing a pattern in a mix. Click this button to go back to the mix editor. The changes made to the pattern will not be saved automatically. You have to click the "Save" button before to save the changes.
8 - Copy
This button is displayed only if you are editing a pattern in a mix. By clicking this button you can copy it to be available in the list of presets. The changes made to the pattern will be saved automatically. The editor switches to the preset mode.
9 - Switch Triad / Four note chords
This checkbox is displayed only if you are editing a n instrument track. By checking this box you choose the four note chord mode. The unchecked value is "Triad". In the triad mode you have three notes per octave available. In the four note chord mode you have four notes per octave available. The four note mode allows you to create patterns for chords like "7" "Maj7" a.s.o. The four note pattern should be a variation of the triad pattern. So first create your pattern in the triad mode and then switch to the four note mode and shift some of your notes to the fourth level. Songbuilder will decide which notes to play depending on the chord type. Four note chords will only be played accurately if the pattern contains some notes of the additional level.
10 - Selection mode Note / Sequence
By checking this box you choose the sequence mode. The unchecked value is "Note". In the note mode you can only select a single note. In the sequence mode you can select a sequence of notes. The sequence selection is a convenient way to apply functions to multiple notes at once. For example you can select a sequence of notes and apply the "Shift" function (16) to all of them. Also you can duplicate entire sequences using the functions (13) or (14).
11 - Length base
The length base for quantization functions (18) and (19). Note lengths and rests can be changed by adding or subtracting an increment of length base. The length base determines also the minimum value for those functions. You can change the length base by selecting a different value from the list. The default value is "Eights".
12 - Add new sequence
Click this button to add a new sequence to the pattern. This button will become active after you have selected a quarter on the editor panel (21). After clicking the button a new quarter note will be inserted at the selected place. The new quarter note will be selected automatically and can be changed using the modifier functions (16-19). The sequence can be continued by using the button (13).
13 - Continue sequence
Click this button to continue a sequence of notes. This button will become active after you have selected an existing note (22). After clicking the button a new note with the same length will be inserted after the selected note. The new note will be selected automatically and can be changed using the modifier functions (16-19). Please note, working with sequences makes it easier to edit patterns using the sequence mode (10). If you apply this function in the sequence mode, the entire section will be appended as a copy.
14 - Duplicate note / sequence
Click this button to duplicate a note or a sequence of notes. This button will become active after you have selected a note or a sequence of notes. Use the sequence selection mode (10) for the latter case. After clicking the button the selected note or sequence will be duplicated and placed one level below the selected one. The new note or sequence will be selected automatically and can be changed using the modifier functions (16-19).
15 - Delete note / sequence
Click this button to delete a note or a sequence of notes. This button will become active after you have selected a note or a sequence of notes. Use the sequence selection mode (10) for the latter case. After clicking the button the selected note or sequence will be removed from the pattern.
16 - Shift note / sequence
Click the plus or minus button to shift a note or a sequence of notes. This button will become active after you have selected a note or a sequence of notes. Use the sequence selection mode (10) for the latter case. After clicking the button the selected note or sequence will be shifted one level up or down. When editing a drum track this function will change the instrument type. In the case of an instrument track the function will change the not level and in case the octave.
17 - Change note length
Click the plus or minus button to change the length of a note. This button will become active after you have selected a note. After clicking the button the selected note will be extended or shortened by the length base (11). You can apply this also in the sequence mode to shorten or extend all notes of the selected sequence.
18 - Change rest length
Click the plus or minus button to change the length of a rest before the selected note. This button will become active after you have selected a note. After clicking the button the rest before the selected note will be extended or shortened by the length base (11). You can apply this also in the sequence mode to shorten or extend all rests of the notes int the selected sequence.
19 - Change note velocity
Click the plus or minus button to change the velocity of a note. This button will become active after you have selected a note. After clicking the button the selected note will be increased or decreased by 5. You can apply this also in the sequence mode to increase or decrease the velocity of all notes of the selected sequence. The velocity value is limited to the range 0-100 (means percentage of maximum).
20 - Editor panel
The editor panel is the place where you can place the notes for an instrument or drum track. It is similar to a piano-roll editor in a common sequencer software. In contrast to a piano-roll editor you can only use the levels of a triad or a four note chords in 5 octaves for an instrument track. In a drum track you can only use the instruments of the preselected drum kit. The editor panel is also restricted to the length of the pattern you selected with (3). In the case of an instrument track on the left side the level and te octave is displayed. In the case of a drum track the instrument type is displayed. The editor panel is divided into 4 quarters per measure and note level or drum instrument. It will display the notes of the pattern with colored bars that can be selected. The selected note can be changed using the modifier functions (16-19).
21 - Quarter selection
Click a quarter on the editor panel (20) to select it. The selected quarter will be highlighted. After selecting the quarter the "Add new sequence" button (12) will become active. The selected quarter will be highlighted.
22 - Note selection
Click a note on the editor panel (20) to select it. The selected note will be highlighted. After selecting the note the modifier functions (16-19) will become active. The selected note will be highlighted. If you select a note in the sequence mode (10) the entire sequence will be highlighted.
23 - Sample Playback - Tempo
The tempo of the sample playback. The default value is 120. You can change the tempo by clicking on the plus and minus buttons in steps of 5.
24 - Sample Playback - Chord Progression
The chord progression of the sample playback. A default value is chosen depending on your activities before. You can select the chord progression from the preset list.
25 - Sample Playback - Key
The key of the sample playback. The default value is "C / Am". You can select the key from the selection list.
26 - Sample Playback - Play
Click this button to play the pattern. The button will change to a stop button. The playback will repeat the pattern 3 times. You can stop the playback by clicking the stop button.