Mix Editor
The mix editor tool allows the user to create mixes that can be used in songs. In mixes you can combine different patterns of different instruments and drums. The following sections will explain how to use the mix editor.
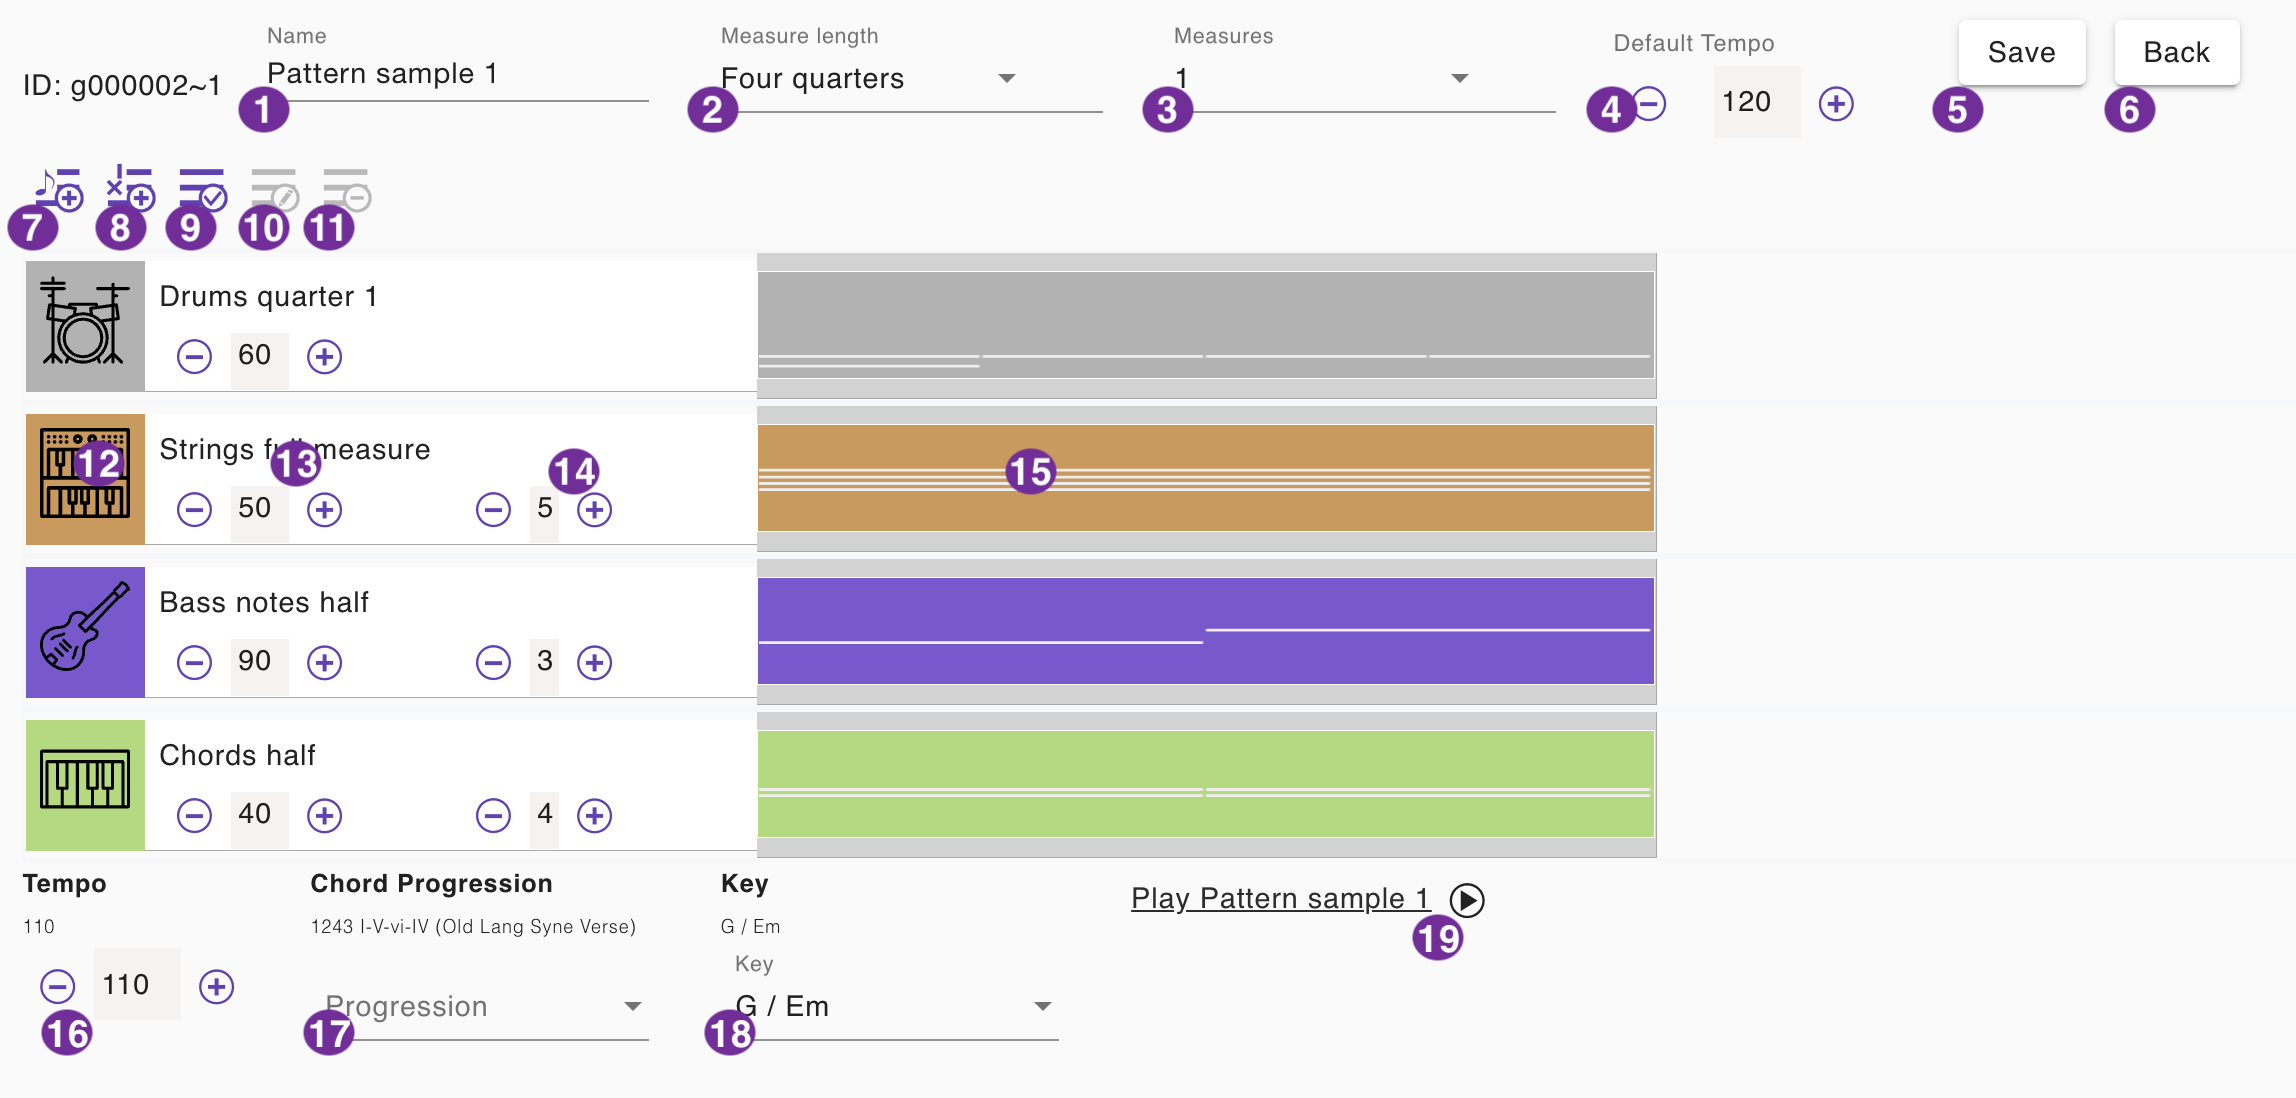
1 - Mix name
Enter the name of the mix. The name will be displayed in the mix selector. It is recommended to use a name that helps you to identify the mix. Using in a song you can just use the name of the section. In a preset you can use a short memorable name which helps you to identify the mix. Make sure that the name is unique because you can not distinguish between two mixes with the same name otherwise.
2 - Measure length
The length of the measure. We always use a quarter note based time signature. That means selecting "3 quarters" will result in a time signature of 3/4, "4 quarters" will result in a time signature of 4/4. If you want to use a time signature of 6/8 you can just select "3 quarters". "4 quarters" is the default value that will be used in most of the songs.
3 - Mix length
The length of the mix in measures. The default value is 1. Make sure that the length of a mix is at least as long as the longest pattern in the mix. If a pattern is shorter than the mix length it will be repeated until the mix length is reached. 4or example if you have a mix length of 4 measures and a pattern length of 2 measures the pattern will be repeated twice.
4 - Default Tempo
The default tempo of the mix in BPM. The default value is 120 BPM. You can change it in steps of 5 BPM by clicking on the plus or minus button. This value will be used for the playback of the mix in the mix editor and the mix presets page. A mix used in a song will always use the tempo of the song.
5 - Save
Click this button to save the mix. If you are editing a mix in a song, the mix will be saved to the song. If you are editing a mix as a preset, the mix will be available in the list of presets.
6 - Back
This button is displayed only if you are editing a mix in a song. Click this button to go back to the song editor. The changes made to the mix will not be saved automatically. You have to click the "Save" button before to save the changes.
7 - Add new instrument pattern
Click this button to add a new instrument pattern track to the mix. The track will be added to the end of the mix. It will be empty. You can add notes using the pattern editor tool by using the edit pattern function (10). By default "Piano" is selected as instrument. You can change the instrument by selecting a different instrument in the instrument selector (12). The new track will use a velocity of 80% and octave 4 as default. You can change it using the velocity control (13) and the octave control (14).
8 - Add new drum pattern
Click this button to add a new drum pattern track to the mix. The track will be added to the end of the mix. It will be empty. You can add notes using the pattern editor tool by using the edit pattern function (10)). The new track will use a velocity of 80% as default. You can change it using the velocity control (13).
9 - Add an existing pattern
Click this button to add an existing pattern as track to the mix. The track will be added to the end of the mix. You can select the pattern from the list of preset patterns. The new track will use the default instrument of the preset, a velocity of 80% and the default octave of the preset. You can change it using the instrument selection (12), velocity control (13) and the octave control (14). Songbuilder will create a copy of the pattern when adding it to the mix. Using the pattern edit function (10) the original pattern will not be changed.
10 - Edit pattern
Click this button to open the pattern editor tool.A dialog window will appear asking you to save the mix and open the pattern editor. Click "Save And Open Editor" to save the mix and open the pattern editor. Otherwise the dialog window will disappear and the pattern will not be changed.
11 - Delete track
Click this button to delete the selected track from the mix. A dialog window will appear asking you to delete the track. Click "Remove" to perform the action. Otherwise the dialog window will disappear and the track will not be deleted.
12 - Instrument selection
The instrument selection for the track. You can change the current instrument by selecting a different instrument from the list. Note that the track must be selected first (15). If the track is not selected you select the track by clicking this area. So click it again if the list does not appear to change the instrument. This function is only available for instrument tracks. Drum tracks will always use the default drum kit.
13 - Velocity control
The velocity control for the track. You can change the velocity by clicking on the plus or minus button. Velocity is measured in percent of the maximum. Using this function you can control the relative volume of the individual track for the mix. The velocity will be changed in steps of 5%.
14 - Octave control
The octave control for the track. You can change the octave by clicking on the plus or minus button. The octave will be changed in steps of 1. This function is only available for instrument tracks.
15 - Track selection
Click this area to select the track. The selected track will be highlighted. The selected track will be used for the functions "Edit pattern" (10), "Delete track" (11) and "Instrument selection" (12).
16 - Sample Playback - Tempo
The tempo of the sample playback. The default value is the default tempo of the pattern (4), in the case you are editing a mix in a song, the tempo of the song will be used. You can change the tempo by clicking on the plus and minus buttons in steps of 5.
17 - Sample Playback - Chord Progression
The chord progression of the sample playback. A default value is chosen depending on your activities before. In the case you are editing a mix in a song, the chord progression will taken from the song. You can select the chord progression from the preset list.
18 - Sample Playback - Key
The key of the sample playback. The default value is "C / Am", in the case you are editing a mix in a song, the key will taken from the song. You can select the key from the selection list.
19 - Sample Playback - Play
Click this button to play the mix. The button will change to a stop button. The playback will repeat the mix 3 times. You can stop the playback by clicking the stop button.